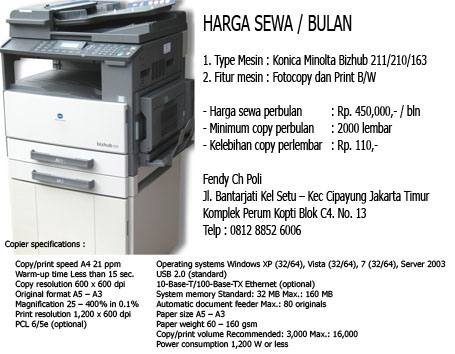
Harga Sewa Fotocopy Murah

Harga Sewa Fotocopy Murah
Promo Sewa Fotocopy
Showing posts with label Panduan Fotocopy. Show all posts

Cara pakai Scanner Canon IR 3245

By photocopy canon | At Sunday, September 15, 2019 | Label : , , , | 0 Comments

Scanning with the Canon iR 3245 Copier

Cara pakai scan fotocopy ir3245

Follow these quick instructions and you can have any image or document scanned and in your email inbox in no time.

Above is the operation panel of the printer/copier in the Teachers’ Room.  The left hand side is a Touch Screen and the right hand side is a more traditional Control Panel.  There are many options with this printer.  These instructions will assist with scanning.

Step 1:


Cara scan pakai canon ir3235
On the Touch Screen, press the third tab from the left, “Send”.

Step 2:

Cara scan pakai canon ir3230
Next, press “Address Book” to send to self or someone in house.  Make another choice from the available options as needed.

Step 3:

Cara scan pakai canon ir3225
Choose the desired name by pressing on the box next to the name (1) – make sure a green check shows.  Then press “OK” (2).

Step 4:

Cara pakai scanner canon ir3245
After confirming that you have chosen the correct destination for your scanned document or image, compress “Start” on the Control Panel.

Step 5:

Cara pakai scan fotocopy ir3245
As noted by the instructions (1), you can change your original and press Start again, or you can simply press “Done” (2).

Cara Buka Service Mode Canon IR yang terkunci Password

By photocopy canon | At Saturday, April 19, 2014 | Label : , | 4 Comments
Cara Buka Service Mode Canon IR yang terkunci Password, yang mungkin rekan-rekan teknisi fotocopy khususnya Canon imageRUNNER pernah mengalaminya dan lupa cara mengatasinya. Nah disini saya akan memberikan solusi bagaimana cara membukanya.
Ikuti "Cara Buka Service Mode Canon IR yang terkunci Password" langkah-langkahnya sebagai berikut:

cara buka servis mode yang terkunci password


Cara Buka Service Mode Canon IR yang terkunci Password
  1. tekan (*) (additional functions)
  2. tekan angka 2 dan 8 secara bersamaan
  3. tekan (*) (additional functions)
Setelah service mode keluar, anda akan diminta mengisikan passwordnya
  1. Silahkan masukan angka 1 sebanyak delapan digit (11111111)
  2. kemudian “OK”
  3. Selesai
Demikian  'Cara Buka Service Mode Canon IR yang terkunci Password' semoga bermanfaat.

Penggunaan Fitur Send Mesin Fotocopy Canon

By photocopy canon | At Monday, December 02, 2013 | Label : , , | 2 Comments
Penggunaan Fitur Send Mesin Fotocopy Canon ini biasanya dimanfaatkan oleh beberapa perusahaan yang sering bertukar data lewat email. Tentu saja fitur ini sangat berguna sekali terlebih fungsi ini sudah ada pada mesin fotocopy modern sekarang ini seperti canon, xerox dll.

Penggunaan Fitur Send pada Mesin Fotocopy Canon iR3245 juga sudah dilengkapi fitur andalan lainnya yaitu sudah bisa Scan Warna, dengan fitur ini anda bisa langsung mengirim hasil scan untuk diemail atau yang biasa disebut Scan to Email.
Bagaimana cara menggunakan fitur SEND Canon iR3245 ini? silahkan ikuti tutorialnya dibawah ini.

Penggunaan Fitur Send Mesin Fotocopy Canon iR3245

Pada layar monitor silahkan tekan fitur “SEND” seperti gambar dibawah ini.

FITUR SEND CANON ir3245
# Penggunaan-Fitur-Send-Mesin-Fotocopy-Canon

Kemudian tekan “ADDRESS BOOK” dan pastikan alamat tujuan sudah tersimpan atau terdaftar di Address Book mesin fotocopy.

Setting-Fitur-Send-Fotocopy
# Fitur-Send-Mesin-Fotocopy-Canon

Pilih Nama yang sudah terdaftar di Address Book pastikan tanda centang hijau sudah muncul dan jangan lupa tekan “OK” seperti gambar dibawah ini.

Cara Seting Menu Send Canon IR
# Cara-setting-Fitur-Send

Setelah konfirmasi dengan menekan tombol “OK” maka anda harus menekan tombol “START”

Penggunaan Fitur Send Fotocopy Canon terbaru
# Fitur-Send-Canon

Maka proses scanning akan berjalan jika anda ingin menambahkan dokumen lagi silahkan letakkan dokumen tersebut pada bidang scanner dan tekan lagi tombol “START” kemudian jangan lupa untuk menekan tombol “DONE”

Penggunaan Fitur Send Mesin Fotocopy Canon iR3245
# Cara-Menggunakan-Fitur-Send-Canon

Demikian tutorial Cara-Menggunakan-Fitur-Send-Pada-Mesin-Fotocopy-Canon-iR3245 ini semoga bermanfaat untuk anda.

Cara Registrasi Scaner Fotocopy Canon IR ke MS Office

By photocopy canon | At Sunday, November 17, 2013 | Label : , , , | 5 Comments
Cara Registrasi Scanner Fotocopy Canon IR ke Microsoft Office.
Berikut ini Cara Registrasi Scaner Fotocopy Canon IR ke MS Office gunanya agar kita bisa memakai scanner canon ir melalui aplikasi dari Microsoft Office ini seperti App Ms Word misalnya, nah agar Microsoft Word ini bisa mengenal suatuh device dari Fotocopy Canon khususnya CANON Imagerunner ini maka kita harus meregistrasi terlebih dahulu dengan asumsi perangkat scanner fotocopy anda sudah terhubung dengan komputer dan sudah terinstall program Network Scangear di PC atau Laptop anda.
Berikut ini langkah-langkahnya, disini saya memakai aplikasi Microsoft Office enterprise 2007:

Cara Registrasi Scanner Fotocopy Canon IR ke Microsoft Office enterprise 2007


1. Klik start >> control panel >> klik 2 kali pada Add or remove program cari Microsoft office. Klik change.
Cara Registrasi Scaner Fotocopy Canon IR ke MS Office 1

2. Pada change your installation of microsoft office enterprise 2007 pastikan Add or Remove Features sudah terpilih kemudian klik Continue.
Cara Registrasi Scaner Fotocopy Canon IR ke MS Office 2

3. Selanjutnya pada installation option klik tanda plus pada Office Tools >> klik lagi tanda plus pada Microsoft Office Document Imaging >> klik 1 kali pada kotak Scanning, OCR and Indexing Service Filter >> klik 1 kali pada Run from My Computer kemudian klik Continue.
Cara Registrasi Scaner Fotocopy Canon IR ke MS Office 3

4. Selesai.

Demikian Cara Registrasi Scanner Fotocopy Canon IR pada Microsoft Office enterprise 2007, dan untuk mencobanya akan saya bahas pada artikel berikutnya yaitu: EDIT HASIL SCAN FOTOCOPY CANON IR LEWAT MS WORD

Cara Inisial Mesin Fotocopy Setelah Mengganti Devloping Unit

By photocopy canon | At Friday, November 15, 2013 | Label : , , | 2 Comments
Setelah Mengganti Devloping unit Fotocopy seperti Mesin Fotocopy iR2270 / iR2870 /iR 3570/ iR4570 / iR2230 / iR3530 / iR4530 dll, maka kita perlu menginisialisasinya. Sebelum masuk kepembahasan "Cara Inisial Mesin Fotocopy Setelah Mengganti Devloping Unit" atau bahasa mesinnya "After Replacing the Developing Unit" maka saya mencoba mengartikan sedikit pengertian Inisialisasi pada mesin Fotocopy Canon Digital atau Canon Imagerunner ini.

Menginisialisasi Mesin Fotocopy Setelah selesai Mengganti Devloping Unit
Inisialisasi Mesin Fotocopy
Menginisialisasi fotocopy canon digital khususnya Canon IR maksudnya adalah untuk mengembalikan setingan-setingan awal atau setingan yang sama seperti sebelum anda mengganti/merubah bagian dari unit devlopingnya yang mungkin telah berubah agar mesin fotocopy dapat bekerja dan berfungsi secara baik.

Menginisialisasi Mesin Fotocopy Setelah Mengganti Devloping Unit ini tidaklah rumit jadi anda sebagai pemulapun dapat mengikutinya bahkan dapat menyelesaikan hanya dalam tempo beberapa menit saja. Oke sekarang langsung saja kita masuk ke pembahasannya.


Cara Inisial Mesin Fotocopy Setelah Mengganti Devloping Unit

1. Jalankan item modus layanan berikut ini:
  • Copier > Function > Install > STIR-K

2. Menginisialisasi item modus layanan berikut ini:
  • Copier > Counter > DBRL-1 > DVG-CYL
3. S e l e s a i.

Demikian Cara Inisial Mesin Fotocopy Setelah Mengganti Devloping Unit, semoga dapat menambah wawasan Cara Servis Mesin Fotocopy Canon anda. Perhatian tes copy yang dibuat tepat setelah toner telah diaduk mungkin dapat menyebabkan kotor di punggungnya dengan adanya sedikit toner yang ngebul, tapi anda tidak usah kawatir karena gejala ini biasanya akan hilang ketika anda selesai mencoba beberapa lembar fotokopian.

Cara membuat akun SMB scan Canon IR

By photocopy canon | At Tuesday, September 17, 2013 | Label : , | 0 Comments
Cara membuat akun SMB scan Canon IR ini dalam bentuk video agar lebih gampang anda pelajari ketimbang hanya membaca teorinya saja.

Cara membuat akun SMB scan Canon IR ini masih berbahasa inggris karena saya ambil dari YOUTUBE dengan judul aslinya:

"CS How to create SMB scan account on Canon IR Series copy machine"

Oke Silahkan anda tonton langsung Cara membuat Account SMB scan Mesin Fotocopy Canon IR Series


Demikian 'Cara membuat akun SMB scan Canon IR' silahkan anda praktekkan pada Photocopy Canon anda, dan jangan lupa likenya serta komentar anda tapi mohon komentar memakai nama ya, jangan pakai Anonim, Trims.

Baca juga  Cara membuat akun FTP Scan Canon IR.

Cara Download Network Scan Gear Tool v2.30 untuk Windows 7 (64bit)

By photocopy canon | At Wednesday, May 15, 2013 | Label : , , , , , | 0 Comments
Berikut panduan Cara Download Network Scan Gear Tool v2.30 untuk Windows 7 (64bit), Windows XP, Vista, Server 2003, Server 2008 untuk anda.

Sumber : http://photocopycanon.blogspot.com/


Network Scan Gear Tool
System Operasi:
  • Windows 7 (x64)
  • Windows Vista (x64)
  • Windows XP (x64)
  • Windows Server 2003 (x64)
  • Windows Server 2008 (x64)
  • Windows Server 2008 R2 (x64)

Terakhir Diperbarui: 24 Jan 2012
Nomor Issue: 01003 12802
Source Url : http://photocopycanon.blogspot.com/

Perincian
* Perhatian Ketika Menggunakan Koneksi USB Cabut kabel USB yang menghubungkan perangkat dgn komputer sebelum menginstal driver.
Setelah menginstal driver sambungkan kembali kabel USB dan Siapkan Driver dan file software aplikasinya.
Berikut petunjuk Cara download software ScanGear v2.30 dan cara meng-extract file yang dikompresi.
  1. Untuk men-download file, klik link file, pilih [Save], dan tentukan direktori di mana Anda ingin menyimpan file tersebut. Download akan dimulai secara otomatis.
  2. File download akan disimpan dalam folder tertentu dalam format self-extracting (format exe.).
  3. Klik dua kali file untuk dekompresi mereka. Sebuah folder baru akan dibuat dalam folder yang sama. Folder baru akan memiliki nama yang sama dengan file terkompresi.
  4. Klik dua kali Setup.exe file didekompresi untuk memulai instalasi.
Perhatian
TWAIN Driver Scan ini adalah untuk driver 32bit yang hanya dapat digunakan dengan aplikasi 32bit-kompatibel berjalan pada OS 64bit.

Informasi File
  • File name : Network Scan Gear
  • File version : 2.30
  • File language : English
  • File size : 17,835KB
Demikian Cara Download Network Scan Gear Tool v2.30 untuk Windows 7 (64bit), Windows XP, Vista, Server 2003, Server 2008.

CARA CLEAR DATA RAM CANON IR

By photocopy canon | At Saturday, May 04, 2013 | Label : , , , , , , | 5 Comments
Title: CARA CLEAR DATA RAM CANON IR
Description: Cara menghapus data ram atau cara setting factory ram data clear fotocopy canon image ready.
Merek Mesin Fotocopy: CANON
Type Mesin Fotocopy: IR5570 | IR6570 | IR5070 | IR5050 | IR5055 | IR5065 | IR5075
Url : http://photocopycanon.blogspot.com/2013/05/cara-clear-data-ram-canon-ir.html
Posted by: Photocopy Canon

CARA CLEAR DATA RAM CANON IR CARA CLEAR DATA RAM Canon IR | MODE FACTORY SETTING atau istilah mesin fotocopy IR yaitu RAM DATA CLEAR ini saya tulis di karenakan kemarin sempat membahas masalah kerusakan atau ERROR pada Mesin Fotocopy Canon IR5570 dimana ada yang bertanya Cara Menghapus Data RAM di Mesin IR5570 | IR6570 | IR5070 ini.

Oleh karena itu untuk menjawab pertanyaan mengenai CARA CLEAR DATA RAM Canon IR ini sudah saya coba terangkan dibawah ini dan semoga aja bisa dimengerti, maklum tulisan/bahasanya kacau, oke lanjut saja disimak :

Cara Setting Mode Factory CANON IR5570 | IR6570 | IR507

CLEAR ALL RAM | CANON IMAGERUNNER

1. Tekan bintang(*)
3. Tekan17 berbarengan
4. Tekan 39 berbarengan
4. Tekan bintang(*)
   (*17 39*)
5. Pilih/tekan pada angka 1
6. pilih RAM DATA CLEAR >> isikan angka 1
7. Tekan oke kemudian isikan angka 2 >> Oke
8. Kemudian matikan switch ON/OFF.
Demikian CARA CLEAR DATA RAM CANON IR / RAM DATA CLEAR pada MODE FACTORY Fotocopy Canon IR ini.

Cara membersihkan RAM DATA CLEAR ini dapat diterapkan pada mesin Fotocopy Canon IR5570 | IR6570 | IR5070 | IR5050 | IR5055 | IR5065 | IR5075 | IR5000 | IR6000 | IR5020 | IR6020 dll. Apabila bermanfat jangan lupa likenya serta kritik maupun sarannya, walaupun baik buruknya kritikan itu akan saya terima sebagai cambuk untuk memberikan yang lebih baik lagi dikemudian hari oke! sampai jumpa diartikel lainnya

Setting ukuran kertas bypass canon np

By photocopy canon | At Wednesday, April 17, 2013 | Label : , , | 8 Comments
multifeeder canon np6230 Cara “Setting ukuran kertas bypass canon np” ini saya bahas di karenakan ada komentar yang bertanya bagaimana cara mengatasi kertas bypass NP6230 hasilnya terpotong bagian tepinya sekitar 2 cm.
Biasanya hasil kopian lewat bypass terpotong kemungkinan sensor kertas di bypass / kertas manual sudah rusak atau kemungkinan setting program yang berubah, untuk itu sebelum sensor kita ganti dengan yang baru ada baiknya kita coba terlebih dahulu lewat program seting kertasnya agar bisa mengembalikan “setting ukuran kertas bypass canon np” yang hasilnya copyannya terpotong.
Bypass NP6230
Berikut ini cara “Setting ukuran kertas bypass canon np” hasilnya terpotong.
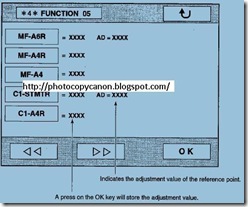
  • Pertama buka service mode *4* >> FUNCTION >> MF-A6R setelah dipilih sekarang geser penjepit kertas di bypass atau tray multifeeder ke posisi A6R kemudian tekan OK.
  • Kedua pilih lagi MF-A4R kemudian geser lagi penjepit kertas ke posisi A4R setelah itu tekan OK lagi.
  • Ketiga pilih lagi MF-A4 kemudian geser lagi penjepit kertas ke posisi A4 setelah itu tekan OK.
  • Keempat tekan RESET di control panel kemudian matikan dan hidupkan kembali fotokopinya.
  • Kelima saatnya untuk mencoba apakah berhasil atau tidak dengan mengkopi selembar dan lihat hasilnya.
  • Keenam apabilah percobaan cara “Setting ukuran kertas bypass canon np”  diatas tidak berhasil berarti sudah waktunya anda mengganti sensornya dengan yang baru.
Demikian tips “cara mengatasi kertas bypass NP6230 hasilnya terpotong” moga bermanfaat

Technorati Tags: ,,,,,,,,,,,,,
,,,,,,,,,,,,,
,,,,,,,,,,,,,,

Panduan Service Fotocopy Canon

By photocopy canon | At Friday, March 15, 2013 | Label : , , , , , | 1 Comments

Pemanas Canon IR

Panduan Service Fotocopy Canon IR6570, 5050, 5070, 5570, 5075 ini mungkin bagi Teknisi Fotocopy hal ini kecil dan gampang untuk memperbaikinya untuk itu sengaja saya rekomendasikan  bagi pemula atau mereka yang ingin baru "Belajar Service Fotocopy Canon".

Panduan Service Fotocopy Canon masalahnya menurut sumber dari master kita di Facebook (Klik aja fbnya kl pgn tau) :

Akibat-akibat yang akan ditimbulkan apabila bearing Lower Roll Canon IR (typenya tersebut diatas)  bermasalah ataupun rusak sbb:

  1. Error E014. Error ini dikarenakan putaran pada motor pemanas yang abnormal atau tidak sesuai, sehingga sensor akan mendeteksi adanya kerusakan pada bagian Motor Pemanas ini.
  2. Error E001. Error ini dikarenakan rusak atau lepasnya ring pengunci pada Upper Roll. Fungsi ring ini adalah untuk mengunci agar roda gigi pada upper roll tidak lepas. Dengan rusaknya ring ini akan menyebabkan perputaran upper roll tidak normal, sehingga terjadilah error E001 ini.

Dengan mengetahui akibat-akibat yang akan terjadi apabila bearing Lower Roll Canon IR ini tidak bekerja sebagai mana mestinya, ada baiknya untuk memeriksa secara berkala bearing-bering pada Mesin Fotocopy anda khususnya pada bagian Lower roll di fixing unit.

Panduan Service Fotocopy Canon ini hanyalah sebagian kecil dari Permasalahan-permasalahan yang terjadi di Mesin Fotocopy Canon anda, untuk itu rawatlah dengan baik mesin anda agar bisa dipakai secara optimal dan tentunya untuk jangka panjang

Bagi Teknisi Canon yang sudah merasa Expert, banyak-banyaklah berbagi jangan takut rejeki atau pendapatan anda berkurang justru kelak anda akan ditambahkan lebih banyak dari apa yang anda duga, by copasdotkom. hehehe.... jd malu eui

Sekian dahulu pembahasan kita kali ini tentang Panduan Service Fotocopy Canon apabila bermanfaat jangan lupa klik tombol suka diatas dan please dong tanggapannya lewat komentar dibawah .........

Firmware Canon Image RUNNER

By photocopy canon | At Thursday, February 14, 2013 | Label : , , , , , , , , | 3 Comments

imageRUNNER

Berikut ini Photocopy Canon akan memberikan tabel Firmware Canon Image RUNNER


Semoga  Firmware Canon Image RUNNER ini dapat menjadi patokan untuk Install ulang Software Canon imageRUNNER anda, dan seperti biasanya jika anda merasa bermanfaat jangan lupa klik tombol SUKA diatas.

Kode Error Canon IR2200/IR2800/IR3300

By photocopy canon | At Friday, December 07, 2012 | Label : , , , , , | 0 Comments

Download Kode Error Canon IR3300 IR2800 IR2200 dan Download Service Manual Canon IR3300 IR2800 IR2200 lewat link diakhir artikel ini.

Code Subcode Description
E000 0000 The reading of the main thermistor does not reach 30oC 1 sec after the main power switch is turned on. Or, it does not reach 70oC 2 sec thereafter
E001 0000 The main thermistor detects 250oC or higher
0001 The main thermistor or the sub thermistor detects overheating (hardware circuit detection)
0002 The sub thermistor detects about 295oC or higher
E002 0000 The temperature of the fixing film is as follows:


  • has exceeded 100oC, but does not reach 115oC within 1 sec thereafter.
  • has exceeded 140oC, but does not reach 150oC within 1 sec thereafter.
  • has exceeded 160oC, but does not reach 165oC within 1 sec thereafter
  • E003 0000 The main thermistor reading is lower than 140oC when paper is moved
    0001 Low fixing temperature detection after standby (by sub thermistor)
    E007 0000 An error in the rotation of the fixing film is detected.
    The reading of the main thermistor is 100oC or higher and, in addition, the fixing film sensor does not detect the rotation of the film for 6 sec or more while the fixing motor is driven
    E010 0000 After the main motor drive signal is generated, the clock signal does to arrive within 1.3 sec
    E014 000 After the fixing motor drive signal is generated, the clock signal does not arrive within 1.3 sec
    E019 0000 The waste toner case is full of waste toner
    E032 0001 The DA unit connection is disconnected (after connection).
    E051 0000 At start-up, home position is not detected when the horizontal registration assembly is moved 100 mm in the direction of home position
    E064 0000 The presence of a high-voltage error is communicated by the composite power supply PCB (The output for primary charging, developing, or transfer has deviated from a specific level of voltage)
    E100 0001 The BD signal is not detected 10 times or more within 10 msec in 5 msec after the generation of the laser drive signal
    0001 The BD signal is not detected 10 times or more within 10 msec in 5 msec after the generation of the laser drive signal
    0002 While the laser is ON, the BD signal cycle is outside a specific range 20 times or more continuously
    0003 While the laser is ON, the horizontal sync signal cycle is outside a specific range 20 times or more
    E110 0000 The motor ready signal does not arrive within 15 sec after the laser scanner motor drive signal is generated
    E202 0001 The scanner home position sensor does not go OFF when the scanner is moved forward by 40 mm
    0002 The scanner home position sensor does not go ON when the scanner is moved reverse 450 mm
    E204 0001 While an original is being read, the image leading edge signal does not arrive from the ADF
    E220 0001 A fault is detected on the inverter PCB for the scanning lamp
    E225 0000 A specific level cannot be attained for the signal during CCD gain correction at power-on
    0002 The edge gain correction level is different from the correction level for the preceding sheet by a specific level or more
    E240 0000 A fault occurs in communication between the CPU of the main controller PCB and the CPU of the DC controller PCB
    E243 0000 A fault occurs in the communication between the CPU of the control panel PCB and the CPU of the main controller PCB
    E248 0001 A difference is discovered between the ID in EEPROM read when the main power switch is turned on and the ID in ROM upon comparison
    0002 The data read does not match the data written to EEPROM
    0003 A difference is discovered between the ID of EEPROM and the ID of ROM upon comparison while writing data
    E261 0000 The intervals of zero-cross signals deviate from the tolerance range while the fixing heater is supplied with power
    E302 0001 During shading, the shading processing does not end on the reader controller PCB after 1 sec
    0002 During stream reading, the edge white addition processing does not end on the rear controller PCB after 10 sec
    E315 - Any of the following is true in the image processing by the main controller:


  • The image data has a fault
  • The encoding/decoding operation for image data has a fault
  • The image processing element of the main controller PCB has a fault
  • E601 0000 When an image is transferred between the main controller PCB and the HDD, the main controller PCB detects a fault in control information
    0001 When an image is transferred between the main controller PCB and the DC controller PCB, the DC controller PCB detects a fault in the control information
    E602 0001 A mounting fault of the HDD is detected when the HDD is started up from the BOOT ROM
    0002 A data read fault of the HDD is detected when the HDD is started up from the BOOT ROM
    E604 0000 A fault is detected in the image memory
    E605 0001 A fault is detected in the battery for the image memory
    E606 0001 A mounting fault of the HDD is detected when the HDD is started up from the BOOT ROM
    E674 0000 A faulty occurs in the communication between the fax PCB and the main controller PCB
    E677 0001 A fault occurs it the combination between any of the printer boards (accessories) and the main controller PCB
    E710 0001 When the main power is turned on, the communication IC (IPC) on the reader controller PCB cannot be initialized
    0002 When the main power is turned on, the communication IC (IPC) on the DC controller PCB cannot be initialized
    0003 When the main power is trend on, the communication IC (IPC) on the main controller PCB cannot be initialized
    E711 0001 Data is written to the error register of the communication IC (IPC) on the reader controller PCB four times or more within 1.5 sec
    0002 Data is written to the error register of the communication IC (IPC) on the DC controller PCB four times or more within 2 sec
    0003 Data is written to the error register of the communication IC (IPC) on the main controller PCB four times or more within 2 sec
    E712 0001 The communication is not resumed 3 sec or more after data has been written to the error register of the communication IC (IPC) on the ADF controller PCB
    0002 The transmission bit is not enabled 10 sec or more in the sync register of the communication IC (IPC) on e reader controller PCB
    E713 0000 The communication with the finisher is not resumed 3 sec or more after it is disrupted
    E716 0000 The ID signal is not detected within a specific period of time after the presence of a pedestal is detected
    E719 0000 Erroneous communication with card reader (serial communication)
    0002 Erroneous communication with coin vender (serial communication)
    E717 0001 The communication with the DA unit is not resumed 3 sec or more after it is disrupted
    E719 0001 The communication between the Card Reader-C1 or the coin vendor and the main controller PCB is disrupted
    E732 0001 A fault is detected by the main controller PCB in the communication between reader controller PCB and the main controller PCB
    E733 0001 A fault is detected by the main controller PCB in the communication between the DC controller PCB and the main controller PCB
    E737 0000 During self diagnosis at power-on, the DRAM check finds a fault in the main controller PCB
    E740 0001 At power-on, the LAN card has a fault
    0002 The MAC address has a fault
    0003 The LAN card cannot be read
    E741 0000 The PCI bus has a fault
    E743 0000 The reader controller PCB detects a fault in the communication between the main controller PCB and the reader controller PCB
    E744 0000 The BootROM on the main controller PCB and the system software are for different models or are of different types
    E803 0000 The 24V output from the composite main power supply PCB is absent for 1 sec or more
    E805 The clock signal is absent for 5 sec or more after the fan drive signal has been generated. The detail codes of the fans in question are as follows:
    0001 developing fan (FM1)
    0002 fixing fan (FM2)
    0003 curl reducing fan (FM4)
    0004 curl reducing fan (FM5)
    0005 electrical unit fan (FM3)
    E901 0000 The motor ready signal does not arrive within 1.3 sec after the pedestal main motor drive signal is generated
    ADF Error Codes
    E420 0001 When the power switch of the host machine is turned on, the back-up data from the EEPROM cannot be read or the data that has been read has a fault
    E421 0001 The back-up data cannot be written to the EEPROM, or the data that has been written has a fault
    E422 0001 While the ADF is in standby, the communication with its host machine is disrupted for 5 sec or more; or, while the ADF is in operation, the communication with its host machine is disrupted for 0.5 sec or more
    Saddle Finisher-G1 Error Codes
    E501 0001 The communication between the finisher controller PCB and the puncher drive PCB is disrupted
    E505 0001 When the main power is turned on, the checksum of the finisher controller PCB has a fault
    0002 When the main power is turned on, the checksum of the puncher driverPCB has a fault
    E510 0001 The feeding roller does not leave home position when the feed motor is driven for 2 sec
    0002 The feeding roller does not return to home position when the feed motor is driven for 2 sec
    E514 0001 The delivery belt does not leave home position when the stack delivery motor is driven for 3 sec
    0002 The delivery belt does not return to home position when the stack delivery motor is driven for 3 sec
    E530 0001 The aligning plate (rear) does not leave home position when the alignment motor (rear) is driven for 3 sec
    0002 The aligning plate (rear) does not return to home position when the alignment motor (rear) is driven for 3 sec
    E531 0001 The stapler does no leave home position when the stapler/folder motor is driven for 1.5 sec
    0002 The stapler does not return to home position when the stapler/folder motor is driven for 1.5 sec
    0003 The clock signal is disrupted for 1 sec or more while the stapler/folder motor is driven
    E532 0001 The stapler unit does not leave home position when the stapler slide motor is driven for 4.5 sec
    0002 The stapler unit does not return to home position when the stapler slide motor is driven for 4.5 sec
    E537 0001 The aligning plate (front) does not leave home position when the alignment motor (front) is driven for 3 sec
    0002 The aligning plate (front) does not return to home potion when the alignment motor (front) is driven for 3 sec
    E540 0001 The paper surface sensor remains unchanged 10 sec after the tray ascent/ descent motor is driven
    0002 The tray upper sensor goes ON while the tray is moving up.
    0003 The clock for the clock sensor is disrupted for 10 sec or more while the tray ascent/descent motor is driven
    E577 0001 The paddle does not leave home position when the paddle motor is driven for 2 sec or more
    0002 The paddle does not return to home position when the paddle motor is driven for 2 sec or more
    0003 The stack ascent/descent guide does not leave home position when the paddle motor is driven for 2 sec or more
    0004 The stack ascent/descent guide does not return to home position when the paddle motor is driven for 2 sec or more
    E590 0001 The puncher does not return to home position when the puncher motor is driven for 250 msec
    0002 The clock from the puncher motor clock sensor is disrupted for 60 msec or more when the puncher motor is driven
    E592 In the course of sensor output automatic adjustment, the light-receiving voltage is 2.5 V or less even when the light-emitting voltage is set to 4.4 V. In the course of output automatic adjustment, the light-receiving voltage is 2.5 V or more even when the light-emitting voltage is set to 0 V. In the course of sensor output automatic adjustment, the light-emitting voltage is set to 4.4 V or more
    0001 to 0005 Horizontal registration sensor
    0006 Puncher waste full sensor
    E593 0001 The puncher not leave home position when the puncher shift motor is driven for 1 sec
    0002 The puncher does not return to home position when the puncher shift motor is driven for 1 sec
    E5F1 0001 The folding roller does not leave home position when the stapler/folder motor is driven for 1.5 sec
    0002 The folding roller does to return to home position when the stapler/folder motor is driven for 3.5 sec or more
    0003 The clock is disrupted for 1 sec or more while the stapler/folder motor is driven
    Finisher-J1 Error Codes
    E500 0000 The communication between the copier and the finisher is disrupted and is not corrected for 5 sec or less
    E514 0000 At the start of the motor CW operation, the stack handling motor (M2) may be driven for a specific number of rotations; however, the stack delivery lever home position sensor (S8) does not go ON
    E530 0000 The alignment motor (M4) is driven for a specific number of rotations, but the aligning plate home position sensor (S7) does not go ON. The alignment motor (M4) is driven for a specific number of rotations, but the aligning plate home position sensor (S7) does not go OFF
    E531 0000 The stapling home position sensor (S16) does not go off 0.5 sec after the stapler motor is rotated CW. The stapling home position sensor (S16) dos not go ON with 0.5 sec after the stapler motor is rotated CW and, thereafter, the sensor does not go ON within 0.5 sec after the motor is rotated in reverse
    E537 0000 The aligning plate home position sensor (S6) does not go ON when the front alignment motor (M3) is driven for a specific number of rotations. The aligning plate home position sensor (S6) does not go OFF when the front alignment motor (M3) is driven for a specific number of rotations
    E577 0000 The return roller does not reach home position when the delivery motor (Ml) has been driven as much as will move it to the return roller home position sensor (S3)
    E580 0000 The delivery tray upper limit sensor (S13) goes ON while the delivery tray ascent/descent motor (M5) is in operation.
    The clock signal of the delivery tray ascent/descent motor clock sensor (S9) is not detected 15 times or more within 0.8 sec while the delivery tray ascent/ descent motor (M5) is in operation.
    The delivery tray paper height sensor (S10) does not go ON 4 sec after the delivery tray ascent/descent motor (M5) starts to move up.
    The delivery tray paper height sensor (S10) does not go OFF 4 sec after the delivery tray ascent/descent motor (M5) starts to move down
    E585 0000 At the start of the motor CCW operation, the stack handling motor (M2) may be driven for a specific number of rotations; however, the stack delivery lever home position sensor (S8) does not go ON
    Ok semoga Error Codes dan Service Manual Canon IR3300 IR2800 IR2200 ini bisa menjadi Panduan Service Fotocopy Canon Imagerunner atau Mesin Fotocopy IR anda.

    Download iR2200 iR2800 iR3300 Service Manual

    Cara Download Software System iR6570 / iR5570

    By photocopy canon | At Tuesday, November 20, 2012 | Label : , , , , , | 2 Comments
    Cara Download Software System iR6570 / iR5570 ini seperti yang saya baca pada Buku Service Manual Canon iR6570 memang masih dalam bahasa aslinya, akan tetapi karena disertai gambar saya rasa tidak begitu kesulitan bagi anda untuk mengikutinya.

    The system software comes in 2 types (one for use inside Japan and the other, outside Japan).
    Unlike previous iR controllers, however, there is only one type of system software. (Previously, one type supported Net Ware while the other did not. There is now only one type for the machine supporting NetWare.)

    Downloading Procedure System Software iR6570 / iR5570
    You can run a downloading session either in normal or safe mode.
    1) Select the version of the system you want to download.
    version system iR6570
    2) Click [Start].
    Firmware Canon iR6570
    3) When the session has ended, click [OK].
    downloading complete iR6570
    4) If you want to start another downloading session, see the appropriate instructions.
    5) When you are done with downloading, turn off and then on the main power.
    6) See the upgrade status indicated on the control panel. When a message appears asking you to turn off and then on the switch, turn off and then on the main power.

    Be sure never to turn off the power while the machine is executing a downloading session or writing downloaded software. The ongoing session will be suspended and the machine may fail to start up.
    writing downloaded software iR6570
    Upgrading complete iR6570
    If the machine fails to start up, format BOOTDEV using HDFormat, and then download system software to be stored in the HDD such as System, Language, and RUI.

    Demikianlah “Cara Download Software System iR6570 / iR5570” moga bisa membantu bagi yang belum paham.

    Enhanced by Zemanta

    Tips agar karyawan Fotocopy Anda betah

    By photocopy canon | At Tuesday, November 20, 2012 | Label : , , , | 0 Comments
    Poncho de Anda
    Poncho de Anda (Photo credit: Wikipedia)
    menjaga hubungan baik anatara karyawan fotocopy dengan andaTips agar karyawan Fotocopy Anda betah, sebenarnya kalau untuk hubungan anda dengan pegawai... yang penting kepercayaan dan ketegasan anda... sulit memang cari pegawai yang jujur, tekun, dan yang mau terus belajar.

    Ada baiknya, jika anda ada waktu... Pada awal anda Buka Usaha Copy Center anda sendiri yang handle dan karyawan sebagai assistant, atau karyawan sebagai pegawai utama, anda sebagai kasir...
    1. untuk cek kondisi barang dll.. Setiap mesin fotocopy punya counter.. jadi anda bisa cek berapa ribu copy yang dilakukan hari itu. tapi jangan lupa, ada yang copy tapi rusak ( dalam hal ini, misal kertas macet, kertas kusut atau hasil cetak tidak sempurna, dan kerusakan hasil cetak karena human error, misalnya salah pembesaran / pengecilan, hasil item karena lupa ditutup, dll). Kalo di tempat ane... sehari antara 1-2% dari total copy yang rusak. cek dengan penghasilan yang anda terima.
    2. Anda harus mempunyai catatan semua stok barang, termasuk stationary/atk. Jadi anda bisa cek berapa jumlah barang yang terjual dengan cek stok. anda bisa pakai excel sederhana atau aplikasi stok barang, cari aja di CCPBB banyak kok.Cek dengan penghasilan yang anda terima.
    3. Jangan pelit.
    4. Kalau pegawai anda memang punya kinerja bagus, beri bonus, insentif atau paling ga hargai usahanya dengan memberi pujian dan encouragement.
    5. Kalau bisa cari pegawai dari keluarga sendiri dulu gan...
    6. pokoknya yg latar belakang keluarganya anda tau... dan tipikal pergaulannya anda tau... jadi terpantau kepribadiannya..
    7. Jalin kedekatan dengan pegawai tsb, sharring, intinya biar pegawai tersebut menganngap anda bukan sebagai BOS, tetapi mitra kerja.. krn pada dasarnya pegawai itu bukan bawahan kita, tetapi mitra kerja kita. Dgn begitu, si pegawai merasa di manusiakan. Minta pendapatnya tentang bagaimana develop usaha anda, permintaan konsumen seperti apa, barang apa yang perlu anda lengkapi, dll...
    8. Kalo anda mmang lagi ada di toko anda, jangan asal suruh aja, kalo dia memang kerepotan, jangan segan buat membantu, dan turun langsung menghadapi konsumen... dgn begitudia merasa anda juga mau kotor...
    so far itu yang ane terapin, jadi pegawai ane loyal, dari buka sampai sekarang masih sama ane gan... meskipun gaji yang ane kasi juga pas pasan... tapi suasana kekeluargaan itu bisa mengikat pegawai lebh kuat dibanding gaji lebih lho... xixixi
    mungkin anda-anda yang lain bisa nambahin...
    ane juga masih nubi, dan ingin belajar sama anda-anda semua. semoga bermanfaat...

    Sumber: http://old.kaskus.co.id/showthread.php?t=6418637&page=4

    Baca juga : Tips Usaha Copy Center
    Enhanced by Zemanta

    Tips Usaha Copy Center

    By photocopy canon | At Tuesday, November 20, 2012 | Label : , , , | 0 Comments
    Tips Usaha Copy Center untuk pemula yang ingin Buka Usaha Fotocopy
    Tips buka usaha Copy Center
    Harga Fotocopy | Copy Center

    Mencoba pasaran dengan mesin fotocopy speed menengah contoh IR3300, IR4570 ya kalau punya dana lebih saya saranin pakai yang high speed seperti IR5000 IR6000 kalau modal tanggung pakai yang IR5570 atau IR6570, bukannya dengan mesin lama (seperti NP6650, 6050, 6030/6035). Jika prospeknya bagus, tambahkan mesin yang mempunya speed yang lebih tinggi seperti IR5020 IR6020 atau IR7200 / IR8500, IR105. Alasannya:

    BIAYA - BIAYA :
    1. BIAYA PERAWATAN MESIN.
    Dilihat dari harga tentu mesin lama lebih murah, tapi coba bandingkan dengan biaya perawatan mobil baru dengan mobil lama. Banyak hidden cost dan yang lebih parah waktu perbaikan dan down time yg mempengaruhi produktivitas anda. Jadi kenapa tidak bayar lebih mahal sedikit tapi bebas pusing?

    2. BIAYA PEMAKAIAN LISTRIK
    Belum lagi biaya listrik mesin lama lebih boros daripada mesin model baru seperti ir4570/5070 yang teknologi nya hemat energi.

    3. BIAYA SPAREPART
    • Pilih lah mesin rekondisi Canon karena sparepart nya lebih gampang di cari dan harganya lebih kompetitif (ibaratkan Toyota dengan Hyundai)
    • Pilihlah sparepart dengan kualitas bagus.Jangan hanya karena harga yang murah saja. Contoh: Toner A, harganya 100rb, tapi hasil kopian cuma 10rb lembar (1 lembar: Rp 10). Sedangkan toner B, harga 110rb tapi hasil kopian 15rb lembar (1 lembar: Rp 7.3).Nah bedanya jauhkan?
    • (hasil kopian juga dipengaruhi setting kehitaman mesin fotocopy anda).Sparepart murah juga dapat merusak kondisi dan kualitas fotokopi anda.
    4. PILIHLAH TEMPAT STRATEGIS
    Beberapa tempat strategis seperti:
    1. Sekolah / Universitas
    2. Pusat bisnis / Perkantoran
    5. UTAMAKAN KUALITAS DAN PELAYANAN
    • Layanilah pelangan dengan senyum. Jika mereka puas, mereka pasti akan kembali walaupun harga anda lebih mahal dari pesaing
    • Berilah bonus-bonus secara berkala seperti bonus mika untuk pelanggan tetap
    • Tawarkan lah servis2 tambahan seperti: antar jemput gratis, fotocopy kilat, dll
    • Berilah bonus untuk pelanggan yg mereferensikan anda. 
      Contoh:
      Si B di rekomendasikan oleh si A untuk menggunakan jasa anda. Kemudian si A datang untuk fotokopi ke anda, dan anda memberikan diskon (sesuai kapasitas anda) untuk si A. Tentu saja, si A akan senang sekali dan kembali merekomendasikan anda kepada temannya.
    •  Bayangkan jika si A ada 50 teman saja.. berapa tambahan pelanggan yang anda dapatkan?

    6. TIPS TUKAR TAMBAH
    Apabila anda membeli Mesin Fotocopy dengan drum besar seperti IR5000, IR6000, usahakan untuk menjaga kondisi drum karena itu yang menentukan harga jual anda jika ingin tukar tambah mesin. Untuk informasi anda, harga drum berkisar antara 7jt - 8jt.
    Jadi perawatan simple seperti:
    - Pastikan Mesin Fotocopy terjaga kebersihannya
    - pastikan tidak ada paper clip/staples yang berserakan dimesin saat fotokopi
    - perawatan dan pembersihan corona wire dan miror-miror secara berkala
    - Pakailah Tinta / Toner berkualitas dan jangan gonta ganti tinta
    - Pastikan anda memakai penstabil tegangan listrik seperti Stabiliser

    Mungkin itu dulu  Tips Usaha Copy Center dari saya moga bisa membantu para pemula yang ingin membuka usaha Fotocopy.
    Artikel ini saya ambil dari forum, yang sudah saya tambahkan sedikit untuk melengkapinya saja.

    Sumber: http://old.kaskus.co.id/showthread.php?t=6418637&page=4

    Baca juga : Tips agar karyawan Fotocopy Anda betah

    Enhanced by Zemanta

    8 Point penting service berkala Fotocopy Canon Ir 4570

    By photocopy canon | At Monday, November 19, 2012 | Label : , , , | 1 Comments
    English: Photocopier Canon NP6521, cleaning, u...
    English: Photocopier Canon NP6521, cleaning, unidentified part. (Photo credit: Wikipedia)
    Photocopier
    Photocopier (Photo credit: Joriel "Joz" Jimenez)
    8 Point penting dalam pelayanan service berkala Fotocopy Canon ir4570 yang harus anda lakukan agar supaya mutu dan kualitas mesin foto copy anda tetap terjaga dan tentunya membuat mesin photocopy canon ir 4570 anda lebih awet.


    Perhatian!
    • Jika Anda menggunakan pelarut, pastikan bahwa bagian-bagian itu telah benar-benar kering sebelum anda memsangnya kembali.
    • Kecuali bagian-bagian yang tidak memakai pelarut cukup pastikan kebersihannya saja.
    • Dalam panduan Service Manual Canon ir4570 ini tidak diperbolehkan menggunakan kain yang dibasahi dengan air.
    • Pastikan untuk memberikan pelayanan yang di jadwalkan pada interval tertentu atau menurut "Panduan Service Fotocopy Canon"

    Untuk Jelasnya "8 Point penting service berkala Fotocopy Canon Ir 4570" bisa anda lihat pada gambar diatas serta keterangan dibawah ini:

    [ 1 ] Copyboard glass, reading glass (clean, using water or mild detergent)
    [ 2 ] Transfer/feed guide (clean; dry wiping)
    [ 3 ] Fixing inlet guide (clean; dry wiping; alcohol)
    [ 4 ] Photosensitive drum butting spacer (clean; dry wiping)
    [ 5 ] Dust-blocking glass (clean; dry wiping or with alcohol)
    [ 6 ] Waste toner collection case (check)
    [ 7 ] Leakage breaker (check)
    [ 8 ] Film bias static eliminator (clean)

    Semoga Canon Ir4570 Ir3570 Ir2870 Ir2270 Service Repair Manual ini bisa bermanfaat bagi rekan-rekan dan jangan lupa klik tombol suka diatas atau tombol share yang ada dibawah agar bisa juga bermanfaat bagi teman-teman yang lain ok salam sukses untuk anda.

    User tags: canon, printer copier fax ir4750 ir3750 ir2870, repair manual, service manual


    Enhanced by Zemanta

    Cara Ganti Drum NP6030 dengan benar

    By photocopy canon | At Saturday, November 17, 2012 | Label : , , , | 4 Comments
    REPLACING THE DRUM UNIT : Canon NP 6030.
    Cara ganti Drum Unit Mesin Fotocopy Canon NP6030 dengan benar sesuai dengan prosedur penggantian Drum NP6030 yang ada pada buku Service Manual NP6030

    Ikuti langkah-langkah "Cara Ganti Drum NP6030 dengan benar" :

    Cara Ganti Drum NP6030 dengan benar ini belum di terjemahkan maklum saya tidak ahli untuk itu, jadi bagi rekan-rekan semua saya mohon maaf ya, tapi setidaknya dari gambar diatas anda sudah mempunyai "Panduan Cara Ganti Drum NP6030 dengan benar"
    Oke sampai nanti kita di artikel lainnya ya jangan lupa untuk memberikan tanggapan/komentar dengan mencantumkan nama jelas dan sopan dalam menulis layaknya orang yang berpendidikan.


    Instalasi Fax Canon imageRUNNER dan Cara Mengirim Fax dari PC Komputer

    By photocopy canon | At Sunday, November 04, 2012 | Label : , , , , | 1 Comments
    Cara Instalasi Fax Canon imageRUNNER dan Cara Mengirim Fax dari PC Komputer anda bisa ikuti langkah-langkahnya sebagai berikut ini:

    1) Pertama Anda harus menambahkan mesin faks sebagai printer di bawah kontrol panel, ikuti langkah-langkah yang sama seperti anda menginstall driver printer fotocopy canon ir, memilih port IP yang sama seperti yang digunakan untuk mesin fotokopi Anda.

    2) Sebelum mengirim pertama, Anda harus mengatur kontak umum Anda di Fax Address Book dan register your fax cover sheet.
    • Pilih "Print" dan memilih Canon Fax dari menu drop down. Selanjutnya pilih Properties
    • Sebuah kotak akan muncul (kanan), pilih "Add Person" dari sisi kanan.
    • Complete information for person, Anda juga dapat membuat grup disini 
    • Kemudian klik pada Register Cover Sheet, meng-upload sampul faks lembar dibuat dalam program Canon Cover Sheet Editor program (Sales Rep for assistance).. 

    3) Cara Mengirim Fax dari PC Komputer
    • Pilih "Print" dan memilih Canon Fax dari menu dropdown. Tekan OK.
    • Sebuah kotak akan muncul pilih "Address Book" dan pilih penerima atau atau Masukkan nomor telepon dan pilih Add Recipient/tambah penerima.
    • Kemudian pilih Cover Sheet Tab dan Pilih sampul Anda, masukkan informasi pengirim dan komentar, Jika Anda menyimpan informasi pengirim, Anda bisa "mengimpor" pengaturan pengirim setiap kali untuk menghemat waktu Anda.
    • Di bawah Sender Dept / Div, gunakan bidang ini sebagai tanggal
    • Tekan OK!
    Demikian pembahasan mengenai  Cara Instalasi Fax Fotocopy Canon Imagerunner (Canon ir) dan Cara Mengirim Fax Mesin Fotocopy ir dari pc komputer.
    Untuk lebih jelasnya silahkan baca disini : Canon Cover Sheet Editor Program
    Enhanced by Zemanta
    Posting Lama ►

    Ingin dapat tips-tips terbaru "Photocopy Canon" seperti cara-cara mengatasi Mesin Fotocopy error, servis manual, download driver dll secara gratis! silahkan masukkan Email anda pada kolom di bawah ini. Setiap artikel yang kami publikasikan, akan langsung kami kirim ke Email anda:

    Delivered by FeedBurner


    CARA PESAN:

    PEMESANAN:
    Silahkan anda menghubungi nomor-nomor dibawah ini untuk pemesanan mesin fotocopy maupun untuk bertanya seputar mesin fotocopy yang ingin anda beli dan juga untuk konfirmasi pembayaran.

    CARA PEMBAYARAN:
    Setelah informasi detail barang dan kesepakatan harga sudah ada persetujuan, silahkan melakukan pembayaran melalaui no rekening kami.

    CARA PENGIRIMAN:
    Apabila semua proses pembayaran dan konfirmasi sudah selesai dan sesuai, maka barang pesanan anda akan segera kami proses dan dikirim berdasarkan alamat pengiriman yang anda berikan kepada kami yang telah disepakati bersama.

    PERSYARATAN:
    Untuk pengiriman dalam area Jakarta atau radius 50km dari tempat kami tidak dikenakan ongkos kirim, sedangkan untuk luar kota dan luar pulau akan dikenakan ongkos kirim dan di tambah biaya packing sesuai dengan harga dari jasa

    HUB Kami:

    Jl. Raya Pagelarang

    Komp KOPTI Blok C4 No. 13

    Kel. Setu - Kec. Cipayung

    Jakarta Timur 13880


    Phone 021 9895 7421
    Fax 021 8497 0328
    Mobile 0812 8852 6006
    Email 1
    fendypoli@gmail.com
    Email 2
    fendypoli@yahoo.com

    TRANSFER BANK


    Copyright © 2012. MESIN FOTOCOPY CANON IR - All Rights Reserved